
Beginners Guide to Dockerizing a Python App

So you've built an app, and you want to deploy it? You've heard about Docker and containers, but haven't ever fiddled with it. Well, you've come to the right place!
Docker is surprisingly easy to use, as seemingly complex as it is! Docker also has a great suite of examples, documentation, and other resources. So I highly recommend you take full advantage of all the documentation they have!
However, if you're like me, I want to get my hands dirty as quickly as possible. So let's go through a practical example of deploying a Python Flask app with Docker!
What is Docker?
I always found it difficult to find a simple definition of Docker, or wrap my head around it, so let's talk about it. What is Docker?
Docker is a suite of tools for creating images and running containers. So, what are images and what are containers?
An image is a set of instructions for deploying an application. It manages all the dependencies, initialization, and any customization you need for your application. Once you have an image, you then run it in a container.
A container is a virtual computer that runs on an existing computer. It helps to separate your application from your existing computer software and installs. As well, it helps separate itself from other containers running on the same machine.
The long short, Docker gives you the ability to package up your application in a nice little box (batteries included), and run it on a computer; away from any other applications that may be running.
It all may seem complex, but it's not as bad as you may think! So let's dive into a hands-on example.
Our app
I plan on utilizing an app I built from a previous post: Build an API quickly, using Flask, Pandas, and SQL - however, you can utilize about any Python application (Django, Flask, or otherwise).
As well, Docker is not solely limited to Python. You should be able to use about any language, as well, there are pre-configured packages for several common languages:
Python
Go
Node
Rust
ASP.NET
Rust
If you don't see yours above, don't worry, just troll Google a bit, and you can likely find docker configurations that meet your needs.
Installing Docker
Installing Docker is relatively easy. You should start with Docker Desktop. It's available on Linux, Windows, and Mac. Please refer to the documentation here. Docker desktop is great because it contains the core Docker functionality with a nifty UI that sits on top of it.
Once you have it installed, open bash or PowerShell, and run the docker command. You should see a variety of descriptions and documentation. As well, you can launch the desktop app for the UI experience.
Creating A Docker Image
docker init
To create or initialize a new Docker container, first, you must navigate to your existing application folder with bash or PowerShell. In my case, it will be "charges_api". Once you are in your application folder, run the docker init command. The Docker Init CLI should pop up, and you'll go through the following options:
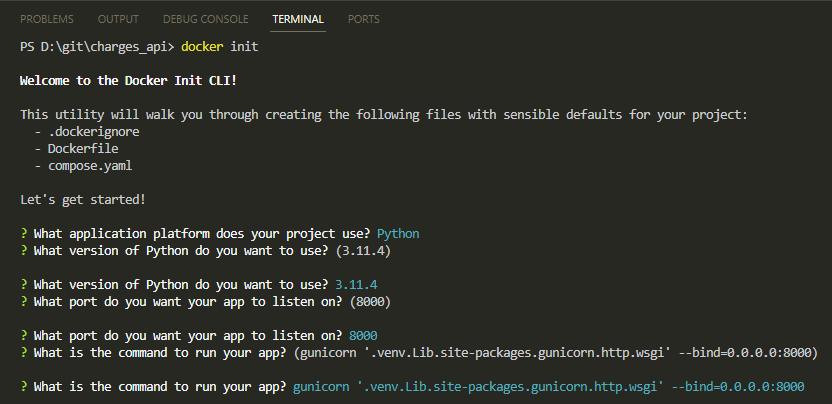
Once finished, you'll have 3 new files in your directory.
.dockerignore- similar to a.gitignorefile, this helps ignore files when Docker builds an imagecompose.yaml- this is a file for configuring multiple container Docker applicationsDockerfile- this includes the instructions for creating a Docker image
For this post, we're just going to focus on the Dockerfile, however, don't be afraid to do research or play around with the other files based on your needs!
Dockerfile
The Dockerfile represents the set of commands that are run to build the image for our application. If you went through the init process above, you likely have some boilerplate code for your app. You might not have to edit this at all, at least initially.
For our use case, we are running the Python app via Gunicorn, so we have to make a change to the Dockerfile. With Gunicorn I've run into issues with the container launching with the standard code. So we're going to modify the file. The last line of my file has the code:
# Run the application.
CMD gunicorn '.venv.Lib.site-packages.gunicorn.http.wsgi' --bind=0.0.0.0:8000
We will change it to:
# Run the application.
CMD ["gunicorn","-b","0.0.0.0:8000","app:app"]
This simply splits the command into its components. This generally resolves issues with the container failing to launch when using Gunicorn.
That's the only changes we have to make to get our app to work. That being said, you can do A LOT of things within this file. You can install dependencies, expose ports, run bash commands, and do many more things.
A good example of something you could do within the Dockerfile is if you utilize JDBC within your Python app, and need to install the Java runtimes; you could do this within the Dockerfile. So, if you have some special requirements that your application needs to run, add them in the file.
For example, if you needed to install Microsoft SQL Server ODBC driver on the standard Python setup for Docker, you can add the following lines prior to the line where the Dockerfil switches to the appuser:
# Download dependencies as a separate step to take advantage of Docker's caching.
# Leverage a cache mount to /root/.cache/pip to speed up subsequent builds.
# Leverage a bind mount to requirements.txt to avoid having to copy them into
# into this layer.
RUN --mount=type=cache,target=/root/.cache/pip \
    --mount=type=bind,source=requirements.txt,target=requirements.txt \
    python -m pip install -r requirements.txt

###### This is the set of commands to install ODBC driver for microsoft sql server
RUN apt-get update
RUN apt-get install -y curl
RUN curl https://packages.microsoft.com/keys/microsoft.asc | tee /etc/apt/trusted.gpg.d/microsoft.asc
RUN curl https://packages.microsoft.com/config/debian/11/prod.list | tee /etc/apt/sources.list.d/mssql-release.list
RUN apt-get update
RUN ACCEPT_EULA=Y apt-get install -y msodbcsql18

# Switch to the non-privileged user to run the application.
USER appuser
docker build
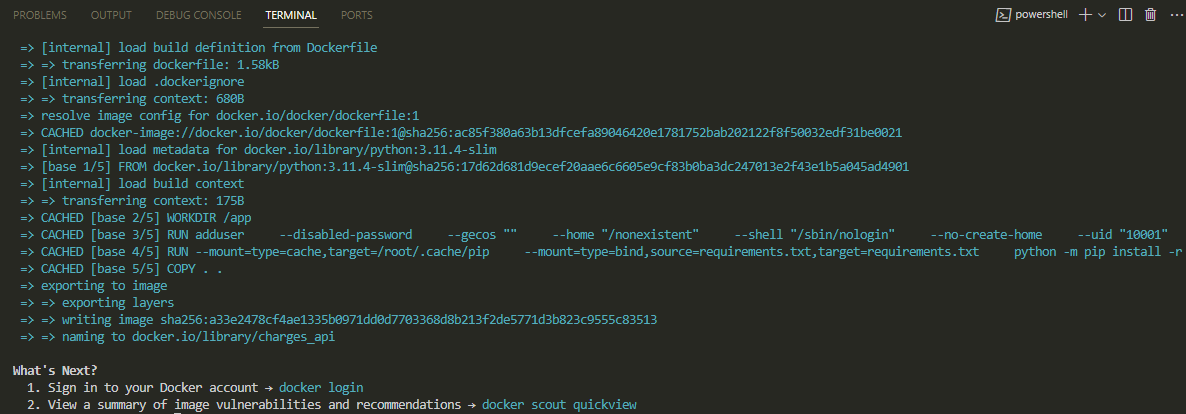
Once your Dockerfile is updated, now it's time to build your image! From within the folder of your application, utilizing bash or PowerShell, run the following command docker build -t charges_api .. This will then build the image for your app. Let's discuss each element of the command:
docker buildthis is simply the docker command for building a docker image within the folder. This command looks for all the files created from ourdocker initcommand, it will then install all the requirements, and register the other files from your application-t charges_apithis is an option for thedocker buildcommand that is simply a tag for your image. Just think of it as a good name for your image, otherwise, Docker will choose it for you. I chosecharges_apifor the tag for my image.this is the path of the build - with it being just.it means it's the entirety of the current folder
Once you run docker build, you will have some output in the window:
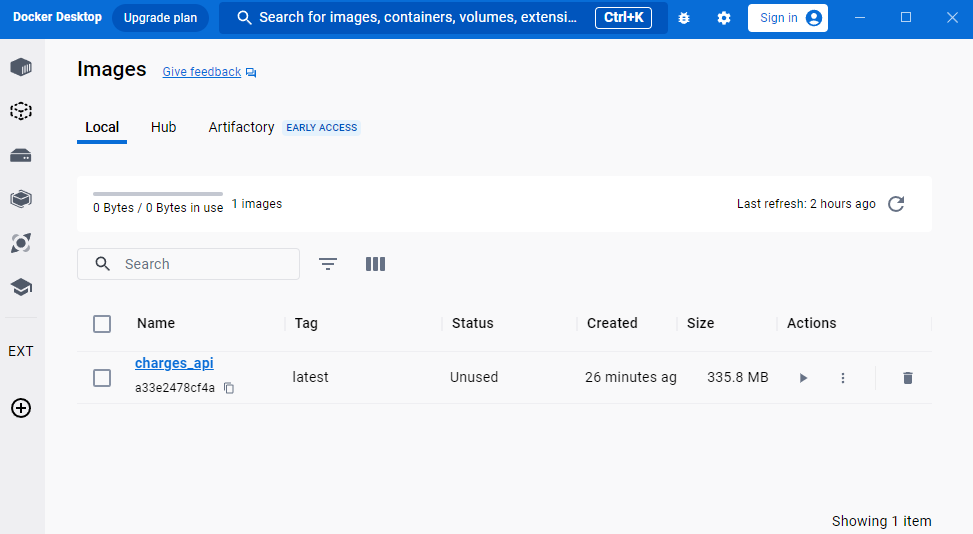
If you then go to your Docker Desktop app, you should actually see the image in the "images" menu:
Running your Docker Image
Once you have your Docker image built, you can now run it! You can either run it from Docker Desktop or from the CLI. Let's talk about both methods!
Docker Desktop
To run your image from Docker Desktop, navigate to the image you just created, and hit the "play" button:
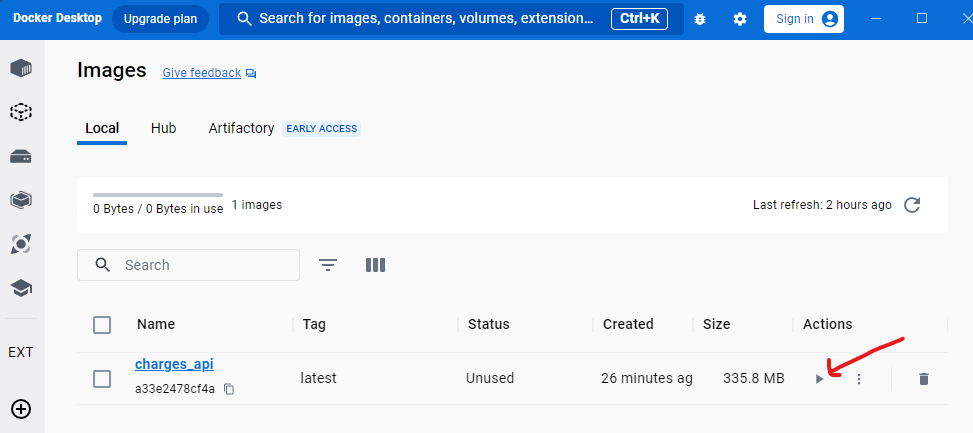
Once you do this, you'll have a menu pop up. This allows you to configure your container. From here, you can configure the following settings:
Container Name
Host Port
Volumes
Environmental Variables
For our application, we only need to configure the "Host Port" and the "Environmental Variables".
For our "Host Port", we're just going to make this 8000.
For our "Environmental Variables", we're going to configure the environmental variables our application needs. In our case, it's just our database connection information.
Our configuration should look something like:
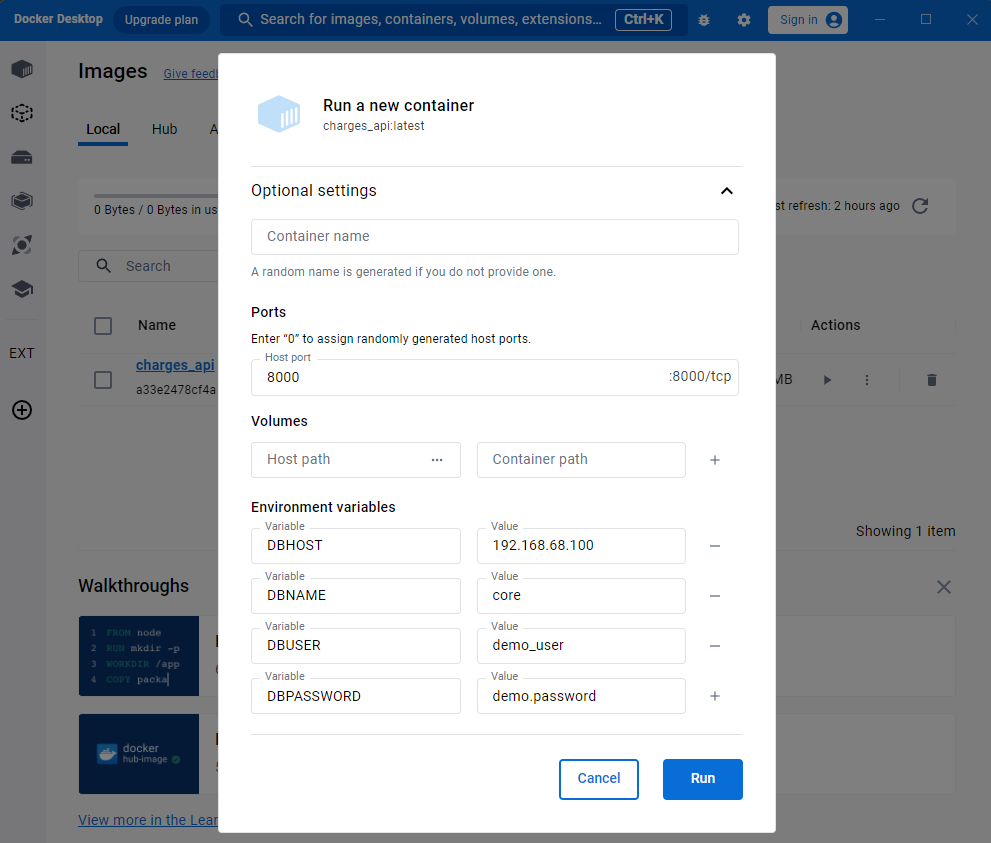
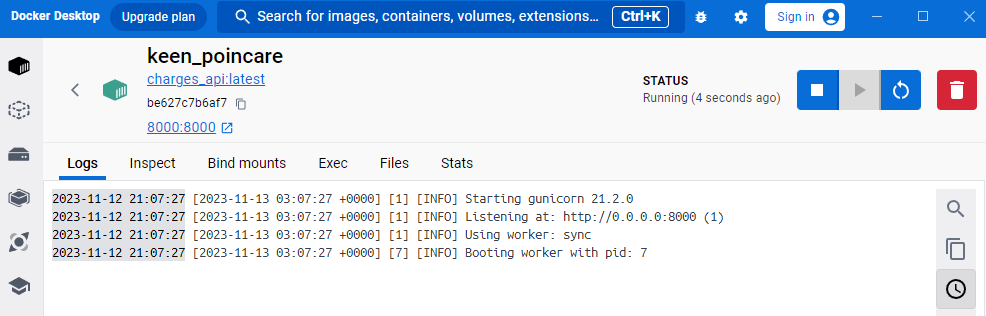
Once we're done, we'll just click "Run". That's it! Once it starts, your container will pop up:
We can then validate the application is running by checking some end points:
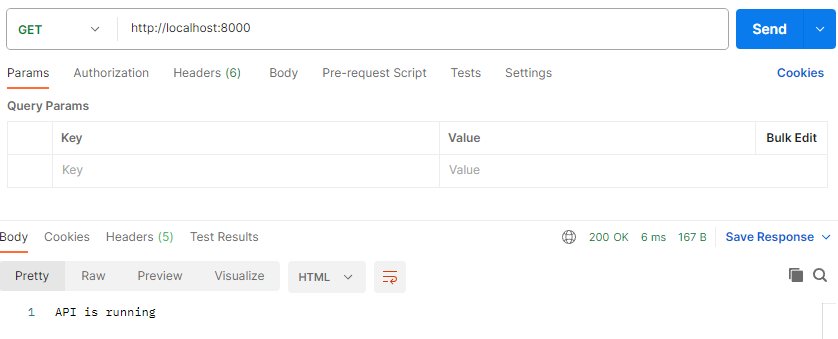
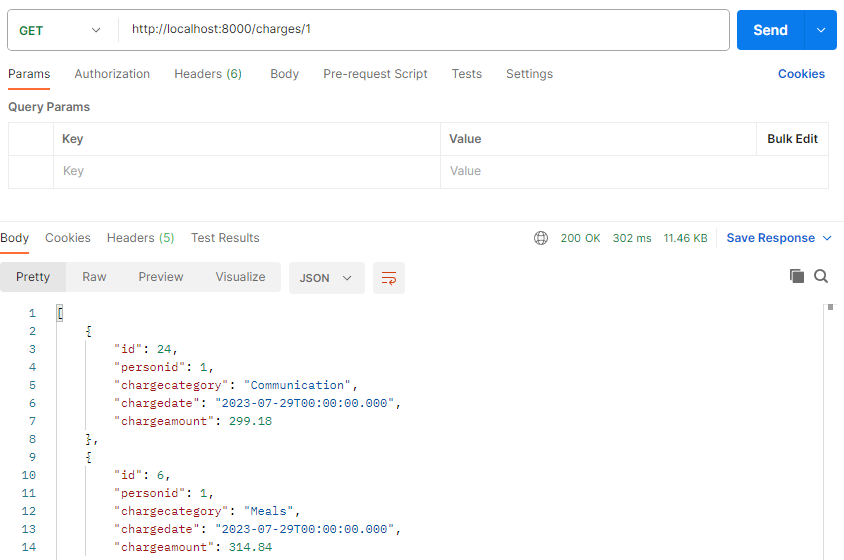
Our app is up and running!
CLI
You can run your image from the Docker CLI as well, and to be honest, as your app gets bigger and more complex, the CLI is REALLY helpful. Particularly when you have more environmental variables, or need to have some custom configurations.
To run our image from the CLI, we're just going to run the following command from our app folder: docker run -dp 8000:8000 --env-file ./.env charges_api . Let's break down what each component is:
docker runthis is simply the command for running a docker image. If you are curious about aspects of the command, you can always rundocker run --help-dp 8000:8000this is a dual-function option:dis used to detach the container from the current bash/Powershell window once it starts up (otherwise the container will continue to run in your current window) - if you would like to run it in your current window and not detach, you can remove this, however, if the window closes, the container will stopppublishes the container's ports to the host - which simply means "Your container has x port, and your app has y port"8000:8000this is the value for thepargument - the first port being the container port, and the second being the application port. In this case they match, but they can be different if needed
--env-file ./.envthis is probably the most powerful part of this command, but this part loads an environmental file containing all your key=value pairs for your environment into the container. It is SUPER helpful, versus having to manually input themcharges_apithis is simply the image you are running - this correlates to the tag you created for your image when you built it in the earlier step
It may seem like a lot, but ultimately it does all the things we did when running from Docker desktop, all from code. Once it runs, it should print out the container_id:

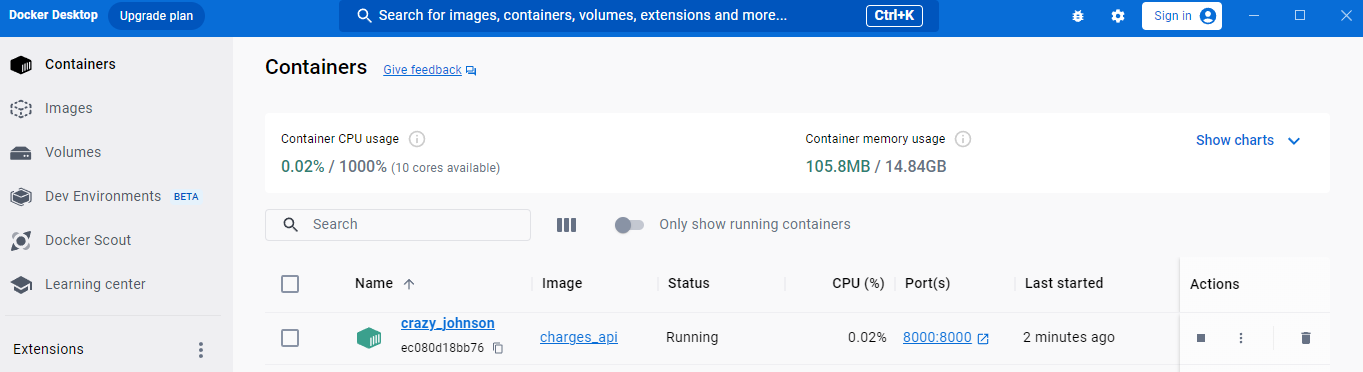
As well, you can always check Docker Desktop to see it running there:
Conclusion
As you can see, building and running a Docker image doesn't have to be intimidating! Might seem like a lot or a bit complex at first, but it's not all that bad.
That being said, as you start to get further into Docker and utilize it, as with any tool, there are always different requirements and obstacles that show up. So, experiment, scour Stackoverflow, and ask other developers!
As well, in full transparency, Docker is not something I've utilized in a formal production setting. It was something I have been wanting to learn, and figured I'd share! This post is meant to focus on the absolute BASICS of Docker, and getting you started. There are many components and nuances I did not address.
As you get further along, and are getting ready to create a production-ready app with Docker, make sure to use Docker's documentation for best practices and recommendations as a starting point. This will help you make other considerations as you make your application production-ready!
Thanks for the read, and I hope you learned something!